Wednesday, December 16, 2015

Christmas House Tour

With Christmas less than 2 weeks away, our tree is lit and decorated, the presents are wrapped, and we are ready to start celebrating!

One of my favorite aspects of decorating is finding inexpensive ways to make our house look beautiful, so many of the items you see here were thrifted or from the Target dollar section.


I found a picture of an entryway bench that I loved, and I showed it to Matt! He built this adorable, sturdy bench in a few hours, and I stained and painted it (so that I could be somewhat helpful in this process!). It's so convenient being married to someone who's handy in the garage!


Now we come to our living and dining room area.


Presents wrapped and under the tree. This yea, we are only buying our kids a few presents each. It saves us time, money, stress, and wrapping paper! We've been reading through the Little House series, and I love how simple their Christmas celebration is. It's definitely inspiring.


View from our kitchen, into our dining room. One of these days, we may hang something on our walls!


Our master bedroom.


And lastly, our stairs. One rainy, dreary afternoon, while the kids were sleeping, I brought together a bunch of Christmas elements we had elsewhere around our house, and decorated our stairs. I had the stairs back to their usual function by the time the kids were awake!


I hope you enjoyed our Christmas house tour!

Merry Christmas!!


Friday, December 4, 2015

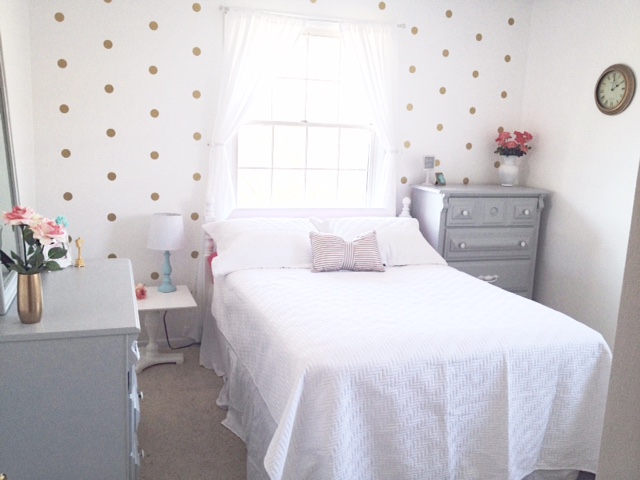
Girls' Bedroom Makeover

Over the past couple years, I've worked on fixing up and decorating various aspects of our house, but re-doing Rachel and Jemima's bedroom has been my favorite project. The last few months, I've grown increasingly more frustrated with not only how their room looked, but how it seemed so disorganized and messy... all the time. I knew we needed a change, but I wasn't sure what I wanted their new room to look like, so I kept putting it off.

That is, until I found Fancy Farm Girls, and the adorable gold polka dot decals they sell! Once they arrived, I started designing the girls' room around the idea of gold dots... and pink (because my little girls love pink)... and a pop of blue (because you can't go wrong there)... and white and gray (I'm the one designing it, after all)! 

After several tiring and exciting days of painting, a little shopping, and decorating, the girls' room was completed!


Here is our source list, for those interested!

Paint: I painted the walls and nightstand with Ultra White (Valspar). We painted the girls' existing dressers, and it made a WORLD of difference! I painted the dressers Polished Silver (also Valspar), which is a lovely light gray, and spraypainted the knobs. 

Curtains and pillow: Target. 

Bedding: We already owned the pink sheets. The white bedding is from Amazon.

The vases, gold clocks (yes, both of them), the coral flowers, and nightstand all came from Goodwill, which means they all cost less than $5 each. Score! 

We painted the girls' lamp, too. I just mixed a little Valspar Rapids (the color of our coffee table) with a bunch of white paint to create a pretty, very light blue! The lampshade is from Walmart.


Our local Michael's store is responsible for the rest of the small decor. I was putting the room together one afternoon this past week, and I realized I needed just a few more decor touches. It was cold and getting dark, but my last-minute trip to Michael's was definitely worth it. I was so pleased with what I found there.


Thank you so much for reading! My blog posts are few and far between these days, but I'd love to see you on Instagram. You can find me @cleanhousewithkids. 

Enjoy your weekend!


Saturday, October 24, 2015

How I Painted a Fabric-Covered Wingback Chair

I am not a seamstress. In fact, if I made a list of activities I do not enjoy, sewing would probably make the top 10. 

That means reupholstering a chair, no matter how awesome it looks, or sturdy, or inexpensive--is "out" for me.

And yet, as I looked through thrift stores, I came across chair after chair that would have been great options for our house... if it were not for the ugly, outdated fabric.

Which made me wonder: is there anything else I could do with a chair, to restore its beauty--without dealing with needles and fabric?

That's when I came across the idea of painting a chair. Not just the legs, but the entire chair, fabric and all. 

It didn't take me long to find this $10 beauty. Besides the light green fabric being slightly stained, the chair was in great shape. And you can't beat that price! I ordered some fabric medium from Amazon (the Martha Stewart brand), and started painting.


This is the after.


As for the painting process, there are lots of tutorials out there on painting fabric-covered furniture, but I'll share with you what I learned along the way.

1. The better condition the furniture is in, the nicer the end product will be. You'll be doing a lot to the fabric--spraying it with water, sanding it, and (obviously) painting it with several coats. It has to look nice to begin with, or no matter what you do, paint won't fix the problem. 

2. Some fabrics work with paint better than others do. I specifically picked a fabric that didn't feel like velvet or corduroy, for example, because I've heard those might not work as well. 

3. Clean your fabric thoroughly before you begin, and let air dry. Fortunately the chair didn't smell, but I still thoroughly cleaned the fabric with a carpet/upholstery cleaner. I was much more comfortable sitting in it after it had been cleaned! 

4. When you're ready to start painting a section, thoroughly spray that section with water. It'll make the paint go on more smoothly. 

5. I mixed two parts paint (I just used Valspar's Vessel Gray, which is the same paint we used on our walls!) with one part fabric medium (which is intended to make the painted fabric softer).


6. After each coat of paint had dried, I lightly sanded it (by hand) with 220 sandpaper. You wouldn't believe the difference sanding makes to the feel of the fabric! It goes from being stiff to soft in less than 30 seconds!

7. I did three coats of paint in some areas, and only two in others. It just depends on the original fabric (how hard it is to cover), and how thickly you're putting on the paint. I read it's better to put on light coats of paint. I'd say I did more like medium coats, because I wanted to make sure the fabric was really covered. I think it ended up fine. 

8. As with any other painting project, watch for runs, or extra thick paint spots, because they'll show up (and look unprofessional) once the paint has dried.

9. The last thing I did was sand and stain the chair legs. 

People have asked if painting fabric is hard to do. I don't think it's any harder or easier than painting any other piece of furniture. It just takes time! 

Now for the big question: would I recommend painting your fabric-covered chairs (or even a couch)??

I wouldn't say the end result is comfy and cozy. The closest thing I can compare the feel of the fabric to would be outside furniture. But it's not scratchy or overly rough. And it looks beautiful. 

I think wingback chairs (and similar furniture styles) are so lovely, and I've always thought it'd be fun to own chairs like that. But usually the price is way out of our price range. So taking a thrifted chair and painting it is a perfect option for us. You also have the fun and flexibility of painting or designing the chair any way or color you'd wish!


So, yes, I'd definitely recommend it! Just don't expect it to be your softest, cuddliest chair. :)


Tuesday, September 29, 2015

How to Create a Stylish Fall Wardrobe [when you don't have any money]

Remember that intriguing blog post I was going to write, about building a stylish fall wardrobe when you don't have any money?

I've written it and re-written it in my mind. I've completely scrapped the idea and gone for a broader "Frugal Living" sort of post, but I keep going back to this post. I said I was going to write it, so even though I don't have any new or grand ideas, I thought I'd share what I DO have.

I just don't want to downplay the fact that it's difficult to live "without money," whatever your situation is. And seriously, it can be hard to justify clothes-shopping when money is tight. After all, you could take that same $12 for a shirt and buy oats and beans and rice... Am I right?

Taking that into consideration, here are some clothes-wearing and shopping ideas for you!


First of all, go through the clothes you already own. Find the items that...

-fit you

-aren't pilled or stained or ripped

-you feel great in

and put those items in a "keep" pile. See, the easiest and least expensive way to create a wardrobe is to wear the items you already OWN!

It's a lot simpler to figure out what you need this season, when you have what you own sitting there in front of you.

Next step: figure out what you still need. I like to find items that I can use in multple outfits. 

When I went through my clothes, I found that the items I "needed" most were...

-a long sleeved gray shirt

-a long sleeved black shirt

-brown boots

The three main colors I wear in the fall/winter would be dark purple, gray, and black, and I already have a couple purple tops from summer that I can transition to fall/winter if I wear a black or gray sweater overtop!

I love gray and black because I can wear them with my skirts OR jeans, depending on how I accessorize them!

Another great option would be a simple striped top--whether it's white and navy stripes or white and black stripes. It's another shirt that can be worn casually or formally, depending on what you pair it with.

I've mentioned buying items you can wear in multiple outfits. Basically, you need to be ok with wearing the same clothes over and over again.

I tried doing just this several weeks ago. At the beginning of summer, I'd purchased several tops that just hadn't lasted. They were looking and feeling stretched and worn out. I looked through my summer tops to find the ones I consistently enjoyed wearing, and... guess what... there were two of them.

This wouldn't be possible if you didn't do laundry often (as I do), but I ended up wearing those tops every day for a couple weeks. I'd wear one, throw it in the wash, wear the other one. Then the weather started cooling off, and I could occasionally wear a long-sleeved top to throw in the mix!

Oh, and by the way... I wore them with my dark wash skinny jeans, of which I have two pairs.

You might be wondering if I got completely sick of these tops and jeans. Nope! Once you establish that you LIKE a certain shirt, I think it's easy to wear it again and again. Every time you wear it, you feel prepared and ready for the day--even if you last wore it two days earlier!

As for the boots, I had a pair of brown boots that I purchased for $15 at Gabes several years ago. Besides looking worn out, they're super uncomfortable. I wear boots "out" all the time in the winter, so that's why new boots made the short list!

Third step: figure out HOW you'll pay for these new items. If you're working with a budget, it's recommended that you decrease the amount you're spending in one area, to make up for the extra money you're spending in another area (in this case: clothes).

OR, my personal favorite way to "earn" extra cash: sell things you're not using around your house. Once you determine that you really "want" one thing, it's interesting how you prioritize what is important to "keep" around your house. Maybe I'm a rare example, but if I see something just sitting, that we haven't read/watched/touched in the last few months, I'm happy to see it go.

Several years ago, we bought the complete series of Stargate: SG1. It came in a beautiful box, and there for several months, we faithfully watched it. But since Netflix came along, and we got different interests, we hadn't watched SG1 in over a year. Which meant... it was gathering dust.

No longer. Matt and I discussed items that we'd rather have around our house (like boots), and I listed SG1 on Ebay. It sold within a week for almost $100. I found a great price on some new boots (also on Ebay), and spent a fraction of our earnings on winter boots--with plenty of money to spare.

I call this method "Sell to Buy." You take items you don't need or want, sell them, and then buy what you'd rather have with the earnings. It's a win-win: you get rid of your unwanted and unused items, and now have the money to buy wanted items you'll use all the time!

So now that you have the money in hand, the fourth and final step to creating a stylish fall wardrobe would be...

Four: Buy a few, nice items to round out your closet!

Here's what I would NOT recommend... buying a few CHEAPLY MADE items that will get pilled/worn out/stretched out in a matter of weeks. I've made that mistake a few too many times. I've even had to throw away a shirt after ONE wearing, it was so awful.

My three favorite places to buy inexpensive and yet NICE QUALITY items would be...

-TJ Maxx

-Goodwill (or local thrift shops)

When you're out shopping (even when the items are inexpensive), keep that list of "needed" items in mind, and focus on just buying those. I've had some thrift store experiences where I thought, "Oh! It's only $4! And it's cute!" So I brought it home, and wore it only a few times. You want to buy items that will fit with your style, and you'll be excited to wear it over and over!

-ThredUp

If you haven't heard of ThredUp before, it's a GREAT place to find awesome deals--good quality stuff, great prices. Once you know which brands you like, and what size you wear, and what you want to buy, you can do specific searches...

Gap, black long-sleeved shirt, size 2 or 4...

or whatever you're looking for!

My best luck with ThredUp has been with jeans. Now I know that I like American Eagle, dark wash jeans, and what size I wear, instead of buying $50 jeans in the store, I can buy the same jeans I like (gently used) for $10-15--or even less.

And while on the topic of ThredUp, if you click my link, you can earn $10 off your first AND SECOND purchases! (Once you place your order, I'll also receive $20. So it's a great deal for both of us!!)

If I could add a P.S. to number four, it would be...

Have fun with accessories. I mean bracelets, earrings, necklaces, scarves, and so on. If you're looking through clearance racks, it's easy to find some of these items for $2 (which is much cheaper than most clothing items). Accessories make it possible to wear the same shirt and skirt three weeks in a row, and no one would ever know, because you're "dressing" it up differently each time.

So there are my ideas. Happy shopping!


Tuesday, September 8, 2015

Why We Got Rid of [Almost All] Our Kids' Toys [and why we don't regret it]

One of the questions I hear from moms most often is, "Where do I put all this STUFF?"

Sometimes they're referring to kids' clothing, or the supplies needed when you have a baby or multiple little ones, but many times... they're referring to TOYS. Books. Puzzles. Dolls. Stuffed animals. Dress-up clothes. Trucks. Cars. Blocks.


Ok, I won't keep going. Add on to that any amount of art supplies that little kids have, and it's easy to see how moms could be so overwhelmed and frustrated!

It's easy to see that, because... I was totally there.

Now, we never had a LOT of toys, but we had enough so that messes were made easily, and I needed multiple storage containers to organize what the kids had.

When we last moved, we downsized how many toys our kids owned, and I even packed half the toys away in a storage closet to help with the scattered-messes-everywhere situation.

And yet still... This is what we were dealing with on a daily basis:

1. The kids would pull out the toy containers and dump them.

2. The toys would get kicked all over the room.

3. The kids wouldn't spend much time actually PLAYING with the TOYS.

4. If one child was playing with a toy, instead of the other children playing with ALL the OTHER toys on the floor, they would end up only fighting (and wanting to play with) that one toy (whichever one it was).

5. It would be time to clean UP the toys, and it would take a very, very long time. Every time.

It was a constant struggle to keep the toys cleaned up. What made it worse is that the kids hadn't especially enjoyed playing with them to begin with! And the fighting. Ohhh, there was a lot of fighting.

Neither Matt nor I was happy about the situation at all. Matt kept suggesting that we get rid of all the toys--or that each child could only have one. I hesitated, thinking, What would our kids play with then?

And then one morning, it happened. We'd asked the kids (like we did all the time, multiple times every day) to clean up their toys, and they hadn't, and the toys were just sitting there, un-played with, but very messy and scattered and frustrating.

I got a trash bag, and we just started filling it. All the toys that were worth selling, we set aside to sell.

You know what was the most shocking part of that moment? How happy the kids were with getting rid of their stuff. Instead of being upset, they were like, "Okay! This is cool! I'll help throw away my toys!!"

We chose to keep two sets of toys--one set of plastic blocks, and my son kept his wooden toolbox (with a few tools inside).

The next few weeks, we could not believe the change in our childrens' behavior.

There was less fighting, because there was less to fight over. There was WAY more drawing, which had hardly ever happened before. I suddenly found the kids sitting at the table with crayons and colored pencils and paper and happily drawing--for very long periods of time!

Which brings me to... they were more content to sit and play the same thing, over and over, than they'd ever been, surrounded by countless plastic and stuffed toys. Their attention spans were longer!

And lastly, they actually became very creative. That set of plastic blocks (which cost me all of $3) has turned into a castle, weaponry, phones, bridges, writing utensils, cups, roads, even a pinata.

As I'm sure you're wondering how long it takes them to clean up all their "toys" now, it's something like 2 minutes and 50 seconds, even if they're not hurrying. Except for the wooden toolbox, which is a little bigger, all their toys can fit in ONE square basket from Target.

If they want to play in their room, they take their basket to their room. It's also been seen in the living room and downstairs. But whenever they're done playing, everything goes back in the basket. And... done.

It's such a relief--all of it--that I can't ever imagine going back. But I know that as our kids grow older, they'll enjoy more games, or puzzles, and I'm sure we'll accumulate a bit more, but for now, this is perfect for us.

Now a couple additional thoughts...

Getting rid of toys (no matter how many issues they may cause) does NOT eliminate bad behavior. Believe me, the bad behavior is still there as long as there are people present! While the fights definitely lessened between the children, they still fight over other things. It's honestly kind of amazing how one child holding something can increase its desirability by an exponential amount!

Secondly, I'm not recommending this sort of action for everyone. As I mentioned at the beginning, I hear moms all the time lamenting their messy family rooms, and asking for help. This is what we did, and I'm so very glad we did, but I'm sure there are other good ways to solve the problems these moms are facing.


Thursday, September 3, 2015

Fall/Winter Capsule Wardrobe

I've mentioned the idea of a "capsule wardrobe" before, but today... I actually went and created one on Polyvore. Talk about FUN. 

The prices of some of these items? Ha. Not exactly in my budget, but it gives me an idea of what sorts of items to be looking for. 

To clarify, no, this isn't what my closet looks like, and no, I don't own [only] three skirts or a pair of black skinny jeans. But this was nevertheless very inspiring, and what I'm definitely working towards. 

The American Eagle skinny jeans pictured are, in fact, what I own, and true to this Polyvore set, I own two pairs. So that part is true, at least. I couldn't own only two pairs of jeans, though, if I didn't wash clothes so often!

I hope you enjoy! Let me know if there are any "staples" that I'm missing... 


Fall/Winter Capsule Wardrobe


Maurices plaid shirt
maurices.com


Diane Von Furstenberg blouse
$345 - graziashop.com


H M black shirt
$12 - hm.com


Saint James white shirt
halsbrook.com


Long sleeve tee
maykool.com


Pieces long sleeve top
$38 - pieces.com


Hobbs green top
$41 - houseoffraser.co.uk


Maurices plus size top
maurices.com


Halston Heritage long skirt
$275 - theoutnet.com


Jane Norman long skirt
$38 - janenorman.co.uk


Boden skirt
bodenusa.com


Glitter Pink flat shoes
$44 - yoox.com


Black pumps
shein.com


Gorjana long necklace
nordstrom.com


Beaded jewelry
amazon.com


Gold jewelry
ylang23.com


Echo infinity scarve
nordstrom.com


Chan Luu scarve
theoutnet.com


Speaking of clothes and budgeting, I'm excited about a post that's in the works regarding just that. Something like, "How to Create a Stylish Fall Wardrobe when You Don't Have Any Money." (And no, I'm definitely not advocating credit cards.) Sounds intriguing, right? Stay tuned.