Showing posts with label projects. Show all posts

Wednesday, December 16, 2015

Christmas House Tour

With Christmas less than 2 weeks away, our tree is lit and decorated, the presents are wrapped, and we are ready to start celebrating!

One of my favorite aspects of decorating is finding inexpensive ways to make our house look beautiful, so many of the items you see here were thrifted or from the Target dollar section.


I found a picture of an entryway bench that I loved, and I showed it to Matt! He built this adorable, sturdy bench in a few hours, and I stained and painted it (so that I could be somewhat helpful in this process!). It's so convenient being married to someone who's handy in the garage!


Now we come to our living and dining room area.


Presents wrapped and under the tree. This yea, we are only buying our kids a few presents each. It saves us time, money, stress, and wrapping paper! We've been reading through the Little House series, and I love how simple their Christmas celebration is. It's definitely inspiring.


View from our kitchen, into our dining room. One of these days, we may hang something on our walls!


Our master bedroom.


And lastly, our stairs. One rainy, dreary afternoon, while the kids were sleeping, I brought together a bunch of Christmas elements we had elsewhere around our house, and decorated our stairs. I had the stairs back to their usual function by the time the kids were awake!


I hope you enjoyed our Christmas house tour!

Merry Christmas!!


Friday, December 4, 2015

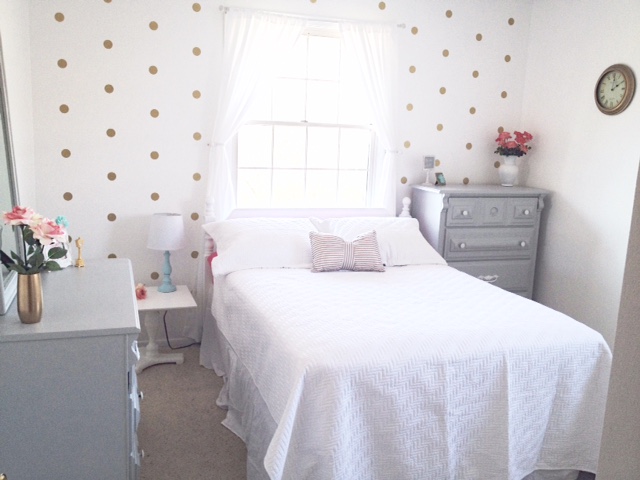
Girls' Bedroom Makeover

Over the past couple years, I've worked on fixing up and decorating various aspects of our house, but re-doing Rachel and Jemima's bedroom has been my favorite project. The last few months, I've grown increasingly more frustrated with not only how their room looked, but how it seemed so disorganized and messy... all the time. I knew we needed a change, but I wasn't sure what I wanted their new room to look like, so I kept putting it off.

That is, until I found Fancy Farm Girls, and the adorable gold polka dot decals they sell! Once they arrived, I started designing the girls' room around the idea of gold dots... and pink (because my little girls love pink)... and a pop of blue (because you can't go wrong there)... and white and gray (I'm the one designing it, after all)! 

After several tiring and exciting days of painting, a little shopping, and decorating, the girls' room was completed!


Here is our source list, for those interested!

Paint: I painted the walls and nightstand with Ultra White (Valspar). We painted the girls' existing dressers, and it made a WORLD of difference! I painted the dressers Polished Silver (also Valspar), which is a lovely light gray, and spraypainted the knobs. 

Curtains and pillow: Target. 

Bedding: We already owned the pink sheets. The white bedding is from Amazon.

The vases, gold clocks (yes, both of them), the coral flowers, and nightstand all came from Goodwill, which means they all cost less than $5 each. Score! 

We painted the girls' lamp, too. I just mixed a little Valspar Rapids (the color of our coffee table) with a bunch of white paint to create a pretty, very light blue! The lampshade is from Walmart.


Our local Michael's store is responsible for the rest of the small decor. I was putting the room together one afternoon this past week, and I realized I needed just a few more decor touches. It was cold and getting dark, but my last-minute trip to Michael's was definitely worth it. I was so pleased with what I found there.


Thank you so much for reading! My blog posts are few and far between these days, but I'd love to see you on Instagram. You can find me @cleanhousewithkids. 

Enjoy your weekend!


Saturday, October 24, 2015

How I Painted a Fabric-Covered Wingback Chair

I am not a seamstress. In fact, if I made a list of activities I do not enjoy, sewing would probably make the top 10. 

That means reupholstering a chair, no matter how awesome it looks, or sturdy, or inexpensive--is "out" for me.

And yet, as I looked through thrift stores, I came across chair after chair that would have been great options for our house... if it were not for the ugly, outdated fabric.

Which made me wonder: is there anything else I could do with a chair, to restore its beauty--without dealing with needles and fabric?

That's when I came across the idea of painting a chair. Not just the legs, but the entire chair, fabric and all. 

It didn't take me long to find this $10 beauty. Besides the light green fabric being slightly stained, the chair was in great shape. And you can't beat that price! I ordered some fabric medium from Amazon (the Martha Stewart brand), and started painting.


This is the after.


As for the painting process, there are lots of tutorials out there on painting fabric-covered furniture, but I'll share with you what I learned along the way.

1. The better condition the furniture is in, the nicer the end product will be. You'll be doing a lot to the fabric--spraying it with water, sanding it, and (obviously) painting it with several coats. It has to look nice to begin with, or no matter what you do, paint won't fix the problem. 

2. Some fabrics work with paint better than others do. I specifically picked a fabric that didn't feel like velvet or corduroy, for example, because I've heard those might not work as well. 

3. Clean your fabric thoroughly before you begin, and let air dry. Fortunately the chair didn't smell, but I still thoroughly cleaned the fabric with a carpet/upholstery cleaner. I was much more comfortable sitting in it after it had been cleaned! 

4. When you're ready to start painting a section, thoroughly spray that section with water. It'll make the paint go on more smoothly. 

5. I mixed two parts paint (I just used Valspar's Vessel Gray, which is the same paint we used on our walls!) with one part fabric medium (which is intended to make the painted fabric softer).


6. After each coat of paint had dried, I lightly sanded it (by hand) with 220 sandpaper. You wouldn't believe the difference sanding makes to the feel of the fabric! It goes from being stiff to soft in less than 30 seconds!

7. I did three coats of paint in some areas, and only two in others. It just depends on the original fabric (how hard it is to cover), and how thickly you're putting on the paint. I read it's better to put on light coats of paint. I'd say I did more like medium coats, because I wanted to make sure the fabric was really covered. I think it ended up fine. 

8. As with any other painting project, watch for runs, or extra thick paint spots, because they'll show up (and look unprofessional) once the paint has dried.

9. The last thing I did was sand and stain the chair legs. 

People have asked if painting fabric is hard to do. I don't think it's any harder or easier than painting any other piece of furniture. It just takes time! 

Now for the big question: would I recommend painting your fabric-covered chairs (or even a couch)??

I wouldn't say the end result is comfy and cozy. The closest thing I can compare the feel of the fabric to would be outside furniture. But it's not scratchy or overly rough. And it looks beautiful. 

I think wingback chairs (and similar furniture styles) are so lovely, and I've always thought it'd be fun to own chairs like that. But usually the price is way out of our price range. So taking a thrifted chair and painting it is a perfect option for us. You also have the fun and flexibility of painting or designing the chair any way or color you'd wish!


So, yes, I'd definitely recommend it! Just don't expect it to be your softest, cuddliest chair. :)


Friday, August 28, 2015

Downstairs Half-bathroom Remodel

When we moved into this house, our downstairs half-bathroom was in the top-five worst-looking spots in the house.

It was covered in outdated, pink wallpaper, the floor was ripped, and the faucet + sink just. looked. bad. "Neglected" is actually a great word for this room. It didn't look like it had had any care for quite some time.


Last year, a week before Caroline was born, my mom and youngest sister stayed up very late at our house, peeling down the wallpaper and repainting the room white. The absence of the wallpaper obviously made a huge difference for the better, but the room still needed some attention.

Matt started by ripping everything OUT (toilet, vanity, medicine cabinet, and flooring). The most time-consuming part of this job was definitely removing the glue from underneath the linoleum floor. We scraped, we sanded, we poured boiling water in an attempt to loosen the glue, we did more scraping... Finally the floor was flat enough to start laying the new flooring.


Once the floor was laid, the fun began. Shopping for and buying the vanity, faucet, white hand towel, mirror, decor... that's all the "best part" for me. It's SO exciting to watch a room go from outdated and ripped-apart to new and clean and fresh!


One by one, we are crossing off areas of our house that need updated! Downstairs half-bath complete, we are off to the next project!

Source List

Paint: Valspar Ultra White
Vanity and faucet: Lowe's
Mirror: Walmart
Soap dispenser and hand towel: TJ Maxx
Decor: Hobby Lobby


Wednesday, July 29, 2015

A Tale of Two Couches

[For those of you who also read M is for Mama, I already had thought of my title before she published her latest post. And she clearly had better luck than I did... but I'm getting ahead of myself.]

I wasn't looking for couches, when I saw that set of "Brand New Gray Leather" couches, advertised on a local Yard Sale Group. 

I had so much fun re-doing our master bedroom, that I was planning to fix up our downstairs one day, too... including switching out our fabric, red-and-green couches (that are super comfortable, smell awesome, recline AND have foot rests) for something more modern--specifically gray, leather couches. 

But couches are expensive, and I had no intention of buying "new" ones any time. Until, of course, I saw this set of "brand new" couches, which looked exactly like what I'd been wanting!!


Excitedly, I began writing back and forth with the owner, only to find out that this set was NEW, never sat on, and she was selling them for one-fifth of the original price. I couldn't believe our good luck!

My plan was to sell our current couches for MORE than what we'd buy these leather couches for, and use the difference to buy some decor to fix off the downstairs' new "look." My hope was that we wouldn't spend ANY money on the downstairs remodel, or--at the most--$100.

We went to look at the couches, and I missed all the warning signs. The owner said she'd never had animals in her townhome, and when she smoked, it was always outside. I can blame the circumstances... the room was dark, I was very pumped, the lady seemed nice. Considering how much she said she'd paid for this set (and how it had NEVER been sat on!), I thought we were getting an incredible deal.

So we bought them. The second they entered our garage, though, we smelled the awful, terrible smell coming from these couches. But I was still excited. They looked great, right? 

But we couldn't get past that smell. I researched how to remove a smoke smell from leather couches, and we got to work. 


I dumped three boxes of baking soda all over those couches, mixed in some coffee grounds, and went to bed for the night.

By the next morning, I'll admit--the smell was MUCH better. I got a bucket of vinegar water and Rachel, Jemima, Matthias and I worked for several hours, wiping down every inch of those beautiful couches.


We repeated the wipe-down-the-couches process with Saddle Soap. By now, the couches were seriously smelling better... but still. Not appropriate for sitting on, hanging out, relaxing, you get the idea.

While removing the cushions, I found the original tag, and called the manufacturer of these couches.

And... Bang. These couches originally cost nothing like what the owner had claimed. These were cheap couches. 

But we figured that one out on our own, after Rachel climbed onto one of them, in her flip-flops, and nicked the fabric. Sad day.

By now, we'd concluded these couches were NOT for us. Besides the smell (which we couldn't fully get rid of), they weren't durable enough to stand the daily wear-and-tear from small children.

So I listed them for sale. But I felt I'd been deceived, and I didn't want to be anything less than fully honest with anyone. I advertised this set as (what they were): From a smoker (and possibly) pet home. 

Guess what. No one wants them. I first advertised them as the price we purchased them, and no one was remotely interested. So I lowered the price--and again, and again. It's a real possibility that we may be listing these gray leather couches as FREE, or (at best) making $100 off them--just to get them out of our garage.

Considering how I love being frugal, and how much I watch our finances, this was a blow. If I were pregnant, I would've been a crying mess. Since I'm not, I just thought about crying, and wanted to cry--and couldn't. 

On the bright side, I've learned three [very expensive] lessons from this whole process.

1. Don't buy a couch that smells bad--whatever the price. I had no idea how difficult it was to remove cigarette smoke from leather furniture, but yes, it's difficult. Hours of my life are lost in cleaning, and they still reek.

2. Even if it means you have to act awkwardly, if you're offering a wad of serious cash for couches, it's definitely worth the time and effort to sit on them and lay on them and smell them and remove the cushions and turn on all the brightest lights around to get the best look possible. And only then, if you're fully satisfied, offer your cash.

3. If you think a room of your house "needs something," it might not necessarily be the most expensive items IN that room, i.e., the couches in your family room.

And here's where I come to the happy part in this whole story. While preparing our family room for the "new look," my mom and I removed the black, broken blinds on the windows and painted the dark-colored trim white. Already, this [free] project made that wall look SO much brighter! 

After we realized we were keeping our original couches, though, our windows needed some sort of window treatment--as now the light was pouring in, and there was no privacy.

I really wanted curtains that looked modern, but still somehow matched our current couches.... and yet, were neutral enough to match any couches (whenever we would find replacement couches).

I had no idea if this was possible, until I saw these in the curtain aisle at Target...


White curtains, with a pretty gold-dotted pattern. Modern, neutral, will match couches present and future. EXACTLY what I wanted!

As soon I ironed the curtain panels, and Matt hung them, I realized these long, light-colored, pretty curtains was what this room needed. Not necessarily new couches, at least not right this minute. Why, oh why, did I not think of this before we paid for the couches?!


But without the purchase of those gray, leather couches, I wouldn't have learned these lessons. And hopefully, I won't soon forget them.


Wednesday, April 15, 2015

Our Master Bedroom Update

Now that we've been in our house for a year, it was time to update our master bedroom! A few years ago, I was very "into" blue and dark brown, and thus our bedroom looked like this...


As we worked in the other rooms of our house, making them modern and fresh-looking, I decided I wanted a completely new look for our bedroom. 

Bright. Clean. Lots of white and light gray. Flowers. I wanted our bedroom to be a refreshing place for Matt and me to retreat to at the end of each day!

We bought the comforter set first, a couple months ago, and that gave us the inspiration for how the rest of the room came together. 

Here is what our room looks like now!


Much of the changes you see here are because of paint. My sister Hannah was an angel and helped me for hours as we transformed this room from blue to white. 

We also painted the dressers (yes, these are the same dressers!), chair, headboard, and lamp base. Paint works magic on furniture that needs some updating! 


Source List for Master Bedroom:
Wall color: Valspar Ultra White
Furniture color: Valspar Polar Star 
Chair: Valspar spraypaint white
Headboard and lamp base color: Valspar spraypaint glossy gray
Bedding: Target
Extra pillows: TJ Maxx
Headboard: found on an online yard sale group
Dressers: handed down from my aunt and uncle
Dresser knobs: Lowe's
Curtains and curtain rods: Target
Chair: Goodwill
Chair cushion: Target
Sign: birthday gift from my sister (purchased from My Paper Nest)
Small potted plant: Michael's
Wire basket: Target
Lamp base: yard sale
Lampshade: Walmart
Alarm clock: Walmart
Hydrangea: Michael's
Mirror: handed down from my sister


For those interested in the cost breakdown of this bedroom update, here you go!

Primer + paint: $116
Bedding: $80
Pillows: $20
Headboard: $40
Dressers: $0
Dresser knobs: $55
Curtains and curtain rods: $109
Chair: $2
Chair cushion: $10
Sign: $0
Small potted plant: $5
Wire basket: $3
Lamp base: $5
Lamp shade: $8
Alarm clock: $15
Hydrangea: $20
Mirror: $0

Total cost: $488

Have a great weekend!

Wednesday, March 18, 2015

Batten Board in the Hallway!

Ever since seeing what John and Sherry (from Young House Love) did with the trim (i.e., batten board) in their hallway, I've been excited about that idea.

The project wasn't expensive (somewhere in the $60 range?), but it was very time-consuming. So many boards to paint, so much trim to measure and cut and nail to the wall.

But in the end, I think all that work was worth it! Batten board definitely transformed the hall from "blah" and boring to "WOW!"

You see the batten board as soon as you enter our house...


You can't really tell from the pictures (hello, camera photos!), but the hall is two [very similar] colors. We painted the upper portion Valspar Polar Star (it's a very, very light gray), and the bottom of the wall (including the boards) is Glossy White.