Monday, February 17, 2020

5 minute way to prep for the day


One of the very best things I’ve started doing to prepare for the next day is to write down my TARGETS- basically my MAIN priorities for the following day. 

Whether it’s laundry (which was UNREAL today- such a big pile but we got through it- the kids watched Pinocchio while distributing #WIN), a specific call you want to make, something that’s imperative you buy that day (hello, eggs and diapers)....

You know ahead of time whats on your days agenda. Don’t let the day happen TO YOU. 

If you had 3-5 SPECIFIC priorities for tomorrow, what would they be.... and WRITE IT DOWN. I don’t care if it’s the notes on your phone or a 3 x 5 card or a journal from target.... write it down. 

Here’s to making our days intentional and not chaotic!! 

If this was helpful, make sure to SAVE this post to re-read on Sunday nights to prep for the week 🥳

th

Wednesday, April 27, 2016

Life After Miscarriage

For anyone out there who has struggled through a miscarriage, this post is for you. My first miscarriage was early (barely 6 weeks), and afterwards, I seemed to recover quickly, and I felt very peaceful. I focused on the word "hope," and Matt and I agreed that if our next daughter was a girl, her middle name would be Hope.

When I became pregnant so quickly again afterwards, I'd say my whole 10 weeks of pregnancy were characterized by hope. I thought this new baby was sent by God to comfort me, so when I started bleeding, I was shocked. The crying I did that day (my birthday) was the worst crying I've done in my life. I've written about this before, but honestly I felt like they were tears of despair. 

As I continued to bleed, but without clots, I clung to hope for five days... until I started bleeding SO much heavier--blood pouring out of me, and I ran to the bathroom saying to Matt, "It's over, it's over, it's over."

This is one of those memories that will stick with me forever. It was so painful--both emotionally and physically.

The bleeding lasted for almost a month, much longer than the bleeding after my first miscarriage. I would tell myself, "You're strong, you can get through this..." At the same time, praying and crying, "God, why are You doing this?" 

The recovery process began once again. But nothing has been quite the same. This miscarriage took me a weak place I've never experienced before. I'd go for days without crying, and then hear a song on the radio, and cry while driving home. Or I told Matt, "I want a baby," and then I'd cry for forever, because I wanted those babies.

There's also a new fear of pregnancy that I've never felt before. And fear of blood. Blood is such a scary sight when it's associated with a tiny life inside you.

There are several truths I've been holding onto this time around that have been very encouraging, even through the emotional struggle.

God knows what is happening. God is the One who is healing my body. God is the One who will enable me to conceive again. God is One who controls whether our next baby will live or die. 

And best of all... God is my Father, and He loves me. He wants only the best for my life, whether or not I understand what He is doing all the time.


Monday, April 4, 2016

My Second Miscarriage Story

This is not the post I was expecting to be writing today. As many of you know, after four healthy pregnancies, I miscarried for the first time in January. I was barely 6 weeks along, and although it was difficult, and many tears were shed on account of our little baby, it was nothing like the miscarriage I just experienced.

After my first miscarriage, I was pregnant again quickly, with a late October due date. It was one of those "I just know I'm pregnant" feelings, and I cried happy tears when I took the pregnancy test. God had blessed again so soon, and I loved the idea of having a baby in October (possibly my favorite time of year). Caroline (our youngest)'s 2nd birthday is in October, and I thought it was going to be so perfect to have two birthdays in the same month. 


I was 9.5 weeks along on my birthday. My mom had come over to bring me my favorite coffee drink (in celebration), and right as she was about to leave, I needed to use the bathroom. As soon as I did so, I saw red blood. It totally caught me off guard. It was the one thing I wasn't expecting--not now, not after I'd already had a miscarriage. Please, Lord, and not on my birthday!

I started crying, and these were not tears like my last miscarriage. It was a raw emotion that I haven't felt for years. It was fear and despair and so much grief at the unknown. Why again? Why so far along?

As I mentioned my story on Instagram, the stories started pouring in. Stories of bleeding during pregnancy, and the babies being fine! Miracle babies--when the moms were sure this baby had died, the doctor continued to hear a heartbeat.

For the next few days, I continued to bleed, but as worrying as it was, I continued to hope that my story would be added to these hosts of others. That the bleeding would stop, and we'd be hearing a heartbeat before we knew it.

I'd been on partial bed rest, trying to sit and rest as much as possible, and I was really feeling pretty well. Sunday morning, I stayed home from church, and that's when the cramping began. The physical pain was on a completely different level than my last miscarriage. I'm not typically a "I'm in pain" sort of person (I prefer to suck it up and keep on going), but this was real pain, like I'd experience in labor. On Sunday night, the bleeding picked up much heavier, and I began losing clots.

Even so, I still was saying to Matt, "I think our baby's going to be ok."

But as soon as I woke up this morning, I felt differently. I was just losing so much blood, and so quickly. I think the miscarriage officially began last night, and it ended this morning. 

I'm certain it will take a while for my body and heart to heal this time around. The process has only just begun.

But for now, I wanted to offer some words of advice on how to respond when someone you know miscarries. Before I miscarried, I had no idea how to respond. I didn't know what miscarriage was like, and I wasn't sure what to say. But now that I've gone through it, and heard a variety of responses to my miscarriages, I know that there is really only one appropriate response.

And that is... I'm sorry. I can't imagine how hard this must be for you. I'm praying for you. Is there any way we can help?

That is all. It's not the time to suggest to the grieving mother that she could've prevented this miscarriage if she wouldn't have had her pregnancies so close together. In fact, any "this is possibly your fault" comments shouldn't even enter the conversation. The mother is already going to be dealing with many of those doubts and fears without anyone critically voicing them. 

No matter how many children a mother has already, she was counting on THIS baby. This next little sibling. Perhaps she was already rolling around baby names in her mind. So yes, of course she values the children she already has, but that doesn't de-value the baby she lost in any way. And losing a baby isn't a sign that she shouldn't have more children. I remember hearing people say this about another mother with multiple children, and it was incredibly insensitive. 

Miscarriage is very painful--both physically and emotionally. A mother finds herself in a place she's never been before, vulnerable and weak and full of emotions she's never before faced. This is the time for friends to show Christ's compassion, and love, and kindness, and to grieve with her for the baby she wanted so much to meet. 


Saturday, March 26, 2016

I Wrote a Book!

Yes, from the girl who hardly ever reads... I decided to write a book.

After becoming active on Instagram, and posting daily about motherhood, I started receiving questions all the time--everything from "When do you take a shower?" to "Could you please describe your morning routine?" Eventually I didn't have the time to answer them all individually, so I concluded the best course of action would be to answer all those questions in book form! 


In the early mornings, and during the kids' nap time, I typed out my answers and created a small book entitled Clean House with Kids. It's very short and readable--perfect for busy moms with little kids! And it's full of practical tips for living life and keeping house with small children.

There's a chapter on time management, and one on how to establish a good routine. I also talk about staying in control of the dishes and laundry, and share tips for creating a stress-free home environment!


After working on it for almost 2 months, Clean House with Kids is ready to order! I hope it's an inspiration and encouragement to you!


Tuesday, March 22, 2016

Our $68 Dining Room Makeover

I'm about to share with you how we brightened our dining room and made it look like a completely different room for only $68 (including a new piece of furniture!). But first, here's what our dining room looked like last year, before we made any of our recent changes.

We bought the dining room table set from Walmart, and it's served us well! The curtains are from Target, and the gray wall color is Vessel Gray by Valspar. Those are the elements here that have stayed... though not exactly stayed the same!

I've read that whenever there is black furniture in a room, it makes the room appear smaller, and I completely agree--though I'd extend that to all dark furniture! I'd walk into the dining room and just think how dark and small it looked, all the time! Finally I decided that our dining room needed a change. Even though our budget was teeny tiny, I was determined to do a mini-makeover!


A couple weeks ago, I heard the weather was going to be nice for a few days, so I purchased a bunch of white spray paint (around $40), pulled all the chairs onto the porch, and started working. Originally I was thinking of writing an entire post on the paint I used, and some tips I had, but honestly... even after spray-painting eight chairs, I don't feel like an expert. I thought that spray-painting would be easy and fast, and though it was easier and faster than brush-painting these chairs (which would've been awful), it definitely still took hours and hours of work and patience.


While the chairs were outside drying, I used Valspar bonding primer and then Ultra White Satin (both of which we had on hand) to paint the table legs, and I rolled the top with Polished Silver. I love the contrast between the light gray and the white!


I mentioned that we had a new piece of furniture for the dining room as well! My sister-in-law bought this sturdy desk for me from Goodwill for $20! I had been looking for a piece just like this! I used Polar Star by Valspar (a very light gray), and rolled as much of it as I could to give it a smooth appearance. Then I spray-painted the handles with Rustoleum oil-rubbed bronze! This whole piece turned out great!


Once I finished painting all the furniture, I just needed a little decor! I didn't want to spend much money, so I headed to A.C. Moore, and found a few flowers, a vase, and a candle for $7!


As for the frame, we already had it, but I wanted to add a chalkboard inside of it! I just traced the inside of the frame with a pencil, and then took the frame down, and quickly rolled on the chalkboard paint. Even with two coats, the whole process still took me less than 15 minutes.

The boxwood wreath was a gift from my sister. She actually DIY-d it, using a grapevine wreath she already had, plus part of a boxwood garland and some hot glue. The whole project only cost her $4!


Our dining room is so much brighter now. Besides the spray-paint, all the paint we used we already had, so it was free! Our table and chairs got a complete makeover, plus we added decor and a new piece of furniture, and spent less than $70! This is definitely something any of you could do! We were so pleased with the final result--both aesthetically and financially!


Wednesday, March 16, 2016

I've Been Gone for a While... but now I'm back!

So... it's been a while. I was thinking about jumping right into our dining room mini-makeover, but then I realized that I wanted to just do a quick post about our life, and what's been happening. We can talk about spray-painting 8 chairs white at a different time!

In the last six months, I've been spending a great deal of time running my Instagram (cleanhousewithkids) and painting or decorating our house. I've also gotten into making videos, which I either do through live streaming (an app called Periscope), or uploading them to my Clean House with Kids facebook page.

As I interacted with my fellow Instagrammers, I started hearing the same questions over and over. How do you control the laundry? How do you manage your time? At first, I was answering all of them individually, but I just didn't have enough time (speaking of time). At the beginning of February, I decided to write a short book answering many of those questions! The writing went well, and I had several people help me with the edits, and it's almost ready to release! 

I'm self-publishing through Lulu (I've worked with them before), and right now I'm just waiting for my proof copy to arrive in the mail! I'm so excited to share it with you--hopefully very soon!

Also in January, I was six weeks pregnant, and I lost our baby. It was a difficult day with many tears, but thankfully I had an amazing support system to help us through it! We were thrilled to find out I was pregnant again, only a month later! Currently, I'm 7.5 weeks along, and feeling great! Normally my pregnancies are very difficult, but I've been taking some health measures that will hopefully make this my easiest and best pregnancy yet. I'll keep you updated on that!


With the book coming out, and a new baby on the way, I'd love to keep up with the blog more consistently. You can also find me on Facebook, Instagram, and the Periscope app! Thanks for being here!

Thursday, January 21, 2016

How Do You Do It All?

Since becoming more active on Instagram, and sharing pictures from our life--both as a mommy with four kids, and as a DIY-er (fixing up and decorating our home!), I've been asked this question over and over: how do you do it all? How are you keeping up with everything?

My first response would obviously be: I'm NOT doing it all. There's no such thing as a "super mom," and there are MANY things (many good things!) I'm not focusing on at this stage of my life. 


Secondly, we struggle with all the same sort of things that any other family with little kids would struggle with! We might do things a little differently, and we have multiple little kids (I'm pregnant with #5, and our oldest is 5!), but we still deal with crumbs on the floor, and temper tantrums, and toilet paper unrolled all over the bathroom floor. And little kids playing in the toilet. 

I should probably add ONE more thing: the things we do now, work for us at this stage in our life. When I'm breast-feeding, or throwing up in the midst of a difficult first trimester, or when the kids are sick, or when Matt worked afternoon shift, we obviously had to switch around the things we did. So what I'm going to say below has worked really well for us, right now, and it may just work for you, too. But it also may not! Here are some suggestions, some ideas--and I hope they're helpful.

1. Form good habits--both for Mom, AND kids.

This is so huge for us, that I wanted to break it into two categories. First, for me as the mother. Good habits would include waking up every morning between 4 and 5 (please don't stop reading now! this is what I DO, and you don't need to do it, remember?), and showering before the kids wake up. Along with putting on makeup in the mornings, I have done these things every single day since Rachel (my oldest) was a baby. I get up- I get a shower- I get dressed- I put on makeup. It's a routine I've established, that makes me feel ready for every single day. 

Other good habits would include starting the laundry right after breakfast, or starting school as soon as I start the laundry. Habits can be very difficult to form, but I've found that once they're in place, you just get used to doing the same things every day, and it's no longer hard.

Ok, now habits for the kids: every morning, the kids wake up between 6 and 7, but they need to stay in their rooms until 7 (this doesn't happen every morning, but it's a general rule). They'll often turn on their lamp and look at books. At 6:45 (or around there), the girls get dressed and make their bed. Then it's time to come out and sit at the table for breakfast. 

After breakfast, Rachel sweeps the kitchen floor, Jemima brings the laundry baskets to the top of the stairs, and Matthias dumps the bathroom trash can into the big kitchen one. They have each had these quick chores for a while now, and it's just part of what they do every morning. Breakfast over- do your chore (and it takes them only a couple minutes each!).

Now for the "keeping the house clean" habits. We really have one rule for this, and that is: before you leave a room, clean it up. That's it. Does it happen perfectly every time? Of course not, but it's what we're aiming for.

Same goes for the girls making their bed every morning. Does their bed look perfect? No, but one of my favorite "mom" sayings is: It doesn't have to be perfect, but you have to do your best. 

2. Keep it simple. 

As moms, in this crazy and busy world we live in, I think we have the tendency to say "yes" to way too much, and take on way more than we need to. I've found that excess (whether it be too many activities or too many toys), leads to chaos--especially when you're dealing with a household full of littles!

Here are three things we keep simple in this house...

Toys for the kids. I've talked about this before, but we have one basketful of blocks for our kids, and that's it when it comes to toys. They also have a basket full of puzzles, and a shelf for their coloring materials (stickers, markers, coloring books, etc.). I've never found that the kids are happier, when there is MORE for them to choose from, and more for them to play with. 

Shopping trips, or leaving the house. Besides church (and socializing with family and friends) on Sunday, we generally leave the house twice a week--for grocery shopping, and to go thrifting. I'm not involved in mom groups, or tons of "extra" activities. 

Meals. I'm not "huge" into cooking, even though we try to eat healthy food. I usually plan ahead what we're going to eat for each meal, and then prepare for that in the morning--whether that means putting some meat in the crockpot before breakfast, or starting lunch at a certain time so I make sure it's ready. 

3. Stay consistent. For us, that means the same nap time and bed times every day. I feel like this is a similar idea to the "good habits" one I mentioned above--we all get used to a certain routine, if we stick with it for long enough. Since my first was a baby, she slept for two hours every afternoon. Whenever another baby came along, they were added to that same sleep schedule, so now we have 4 kids doing either "quiet play" (for the two older ones, who don't nap anymore), or "nap time" every day, at the same time, for two hours. 

For Rachel and Jemima, they have several activities in their room that are ONLY for "quiet play" time, so they LOVE this time in the afternoon. They also love the chance to play uninterrupted from their younger siblings! 

(I should mention that these two hours are so amazing for me as the mom, to either rest and re-focus, or work on a painting project, paying the bills, and so on!).

At night, all the kids are in bed by 7:30. (We happen to get up early, which is why they go to sleep early!)

We generally do the same things every day, in the same order. Breakfast, then chores, then start laundry, then I read to the kids (Bible, science, and history), then Caroline takes a morning nap while I start school with the older kids. And it goes from there. 

Another area we try to stay consistent would be having the kids obey us, every time. One of the things we're working on is the kids sitting still while watching a movie or reading books together... and teaching our kids is way more important than the book or movie. It's hard to be consistent here, because obviously our tendency would be just keep pushing through, give the child what they want so they'll just BE QUIET so we can HEAR the MOVIE, but obviously that's not best for the child or the situation!

So this is what has been hugely helpful to us recently, and I hope it may be encouraging to some of you! 


Wednesday, December 16, 2015

Christmas House Tour

With Christmas less than 2 weeks away, our tree is lit and decorated, the presents are wrapped, and we are ready to start celebrating!

One of my favorite aspects of decorating is finding inexpensive ways to make our house look beautiful, so many of the items you see here were thrifted or from the Target dollar section.


I found a picture of an entryway bench that I loved, and I showed it to Matt! He built this adorable, sturdy bench in a few hours, and I stained and painted it (so that I could be somewhat helpful in this process!). It's so convenient being married to someone who's handy in the garage!


Now we come to our living and dining room area.


Presents wrapped and under the tree. This yea, we are only buying our kids a few presents each. It saves us time, money, stress, and wrapping paper! We've been reading through the Little House series, and I love how simple their Christmas celebration is. It's definitely inspiring.


View from our kitchen, into our dining room. One of these days, we may hang something on our walls!


Our master bedroom.


And lastly, our stairs. One rainy, dreary afternoon, while the kids were sleeping, I brought together a bunch of Christmas elements we had elsewhere around our house, and decorated our stairs. I had the stairs back to their usual function by the time the kids were awake!


I hope you enjoyed our Christmas house tour!

Merry Christmas!!


Friday, December 4, 2015

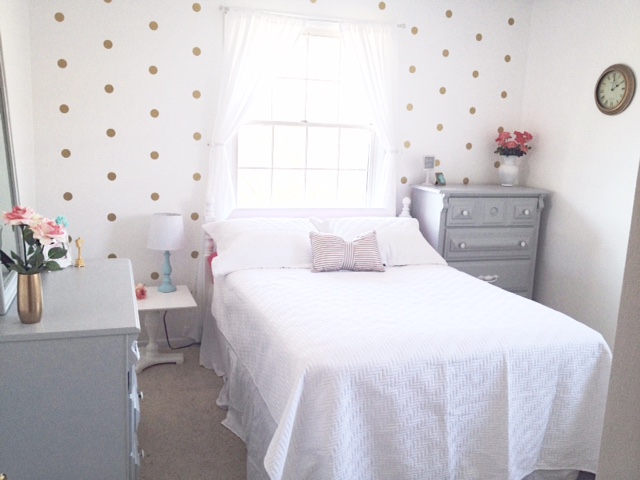
Girls' Bedroom Makeover

Over the past couple years, I've worked on fixing up and decorating various aspects of our house, but re-doing Rachel and Jemima's bedroom has been my favorite project. The last few months, I've grown increasingly more frustrated with not only how their room looked, but how it seemed so disorganized and messy... all the time. I knew we needed a change, but I wasn't sure what I wanted their new room to look like, so I kept putting it off.

That is, until I found Fancy Farm Girls, and the adorable gold polka dot decals they sell! Once they arrived, I started designing the girls' room around the idea of gold dots... and pink (because my little girls love pink)... and a pop of blue (because you can't go wrong there)... and white and gray (I'm the one designing it, after all)! 

After several tiring and exciting days of painting, a little shopping, and decorating, the girls' room was completed!


Here is our source list, for those interested!

Paint: I painted the walls and nightstand with Ultra White (Valspar). We painted the girls' existing dressers, and it made a WORLD of difference! I painted the dressers Polished Silver (also Valspar), which is a lovely light gray, and spraypainted the knobs. 

Curtains and pillow: Target. 

Bedding: We already owned the pink sheets. The white bedding is from Amazon.

The vases, gold clocks (yes, both of them), the coral flowers, and nightstand all came from Goodwill, which means they all cost less than $5 each. Score! 

We painted the girls' lamp, too. I just mixed a little Valspar Rapids (the color of our coffee table) with a bunch of white paint to create a pretty, very light blue! The lampshade is from Walmart.


Our local Michael's store is responsible for the rest of the small decor. I was putting the room together one afternoon this past week, and I realized I needed just a few more decor touches. It was cold and getting dark, but my last-minute trip to Michael's was definitely worth it. I was so pleased with what I found there.


Thank you so much for reading! My blog posts are few and far between these days, but I'd love to see you on Instagram. You can find me @cleanhousewithkids. 

Enjoy your weekend!


Saturday, October 24, 2015

How I Painted a Fabric-Covered Wingback Chair

I am not a seamstress. In fact, if I made a list of activities I do not enjoy, sewing would probably make the top 10. 

That means reupholstering a chair, no matter how awesome it looks, or sturdy, or inexpensive--is "out" for me.

And yet, as I looked through thrift stores, I came across chair after chair that would have been great options for our house... if it were not for the ugly, outdated fabric.

Which made me wonder: is there anything else I could do with a chair, to restore its beauty--without dealing with needles and fabric?

That's when I came across the idea of painting a chair. Not just the legs, but the entire chair, fabric and all. 

It didn't take me long to find this $10 beauty. Besides the light green fabric being slightly stained, the chair was in great shape. And you can't beat that price! I ordered some fabric medium from Amazon (the Martha Stewart brand), and started painting.


This is the after.


As for the painting process, there are lots of tutorials out there on painting fabric-covered furniture, but I'll share with you what I learned along the way.

1. The better condition the furniture is in, the nicer the end product will be. You'll be doing a lot to the fabric--spraying it with water, sanding it, and (obviously) painting it with several coats. It has to look nice to begin with, or no matter what you do, paint won't fix the problem. 

2. Some fabrics work with paint better than others do. I specifically picked a fabric that didn't feel like velvet or corduroy, for example, because I've heard those might not work as well. 

3. Clean your fabric thoroughly before you begin, and let air dry. Fortunately the chair didn't smell, but I still thoroughly cleaned the fabric with a carpet/upholstery cleaner. I was much more comfortable sitting in it after it had been cleaned! 

4. When you're ready to start painting a section, thoroughly spray that section with water. It'll make the paint go on more smoothly. 

5. I mixed two parts paint (I just used Valspar's Vessel Gray, which is the same paint we used on our walls!) with one part fabric medium (which is intended to make the painted fabric softer).


6. After each coat of paint had dried, I lightly sanded it (by hand) with 220 sandpaper. You wouldn't believe the difference sanding makes to the feel of the fabric! It goes from being stiff to soft in less than 30 seconds!

7. I did three coats of paint in some areas, and only two in others. It just depends on the original fabric (how hard it is to cover), and how thickly you're putting on the paint. I read it's better to put on light coats of paint. I'd say I did more like medium coats, because I wanted to make sure the fabric was really covered. I think it ended up fine. 

8. As with any other painting project, watch for runs, or extra thick paint spots, because they'll show up (and look unprofessional) once the paint has dried.

9. The last thing I did was sand and stain the chair legs. 

People have asked if painting fabric is hard to do. I don't think it's any harder or easier than painting any other piece of furniture. It just takes time! 

Now for the big question: would I recommend painting your fabric-covered chairs (or even a couch)??

I wouldn't say the end result is comfy and cozy. The closest thing I can compare the feel of the fabric to would be outside furniture. But it's not scratchy or overly rough. And it looks beautiful. 

I think wingback chairs (and similar furniture styles) are so lovely, and I've always thought it'd be fun to own chairs like that. But usually the price is way out of our price range. So taking a thrifted chair and painting it is a perfect option for us. You also have the fun and flexibility of painting or designing the chair any way or color you'd wish!


So, yes, I'd definitely recommend it! Just don't expect it to be your softest, cuddliest chair. :)